> ## Documentation Index
> Fetch the complete documentation index at: https://docs.shipmobilefast.com/llms.txt
> Use this file to discover all available pages before exploring further.
# 3. AI Proxy Backend
> Set up your AI Proxy Backend.
### Now we need to set up our AI Proxy Backend.
The AI Proxy Backend is a NodeJS backend that will proxy requests to AI services.
So your API keys are not exposed to the users. They are safe in the backend.
# AI Proxy Backend Guide
## Requirement!
Firebase Service Account JSON file.
You can not send requests to the backend without Firebase Token Verification. This is a security feature.
## Available Endpoints
* `/auth` `POST` endpoint for authentication and get secret key.
* `/ai/openai` `POST` endpoint for OpenAI requests
* `/ai/openai/stream` `POST` endpoint for OpenAI streaming requests
* `/ai/vision` `POST` endpoint for OpenAI Vision API requests
* `/ai/anthropic` `POST` endpoint for Anthropic requests
* `/ai/anthropic/stream` `POST` endpoint for Anthropic streaming requests
* `/ai/replicate/generate` `POST` endpoint for Replicate requests
* `/ai/fal/generate` `POST` endpoint for Fal AI requests
## Security Architecture
Our backend uses a multi-layer security approach:
1. First Layer: **API Key Protection**
* We don't send the API\_KEY directly
* Instead, we create a signature using the API\_KEY
* Check the `useHmac` hook and `api-client.ts` in the Expo code for implementation
2. Second Layer: **HMAC Authentication**
* Backend validates the signature
* If valid, returns an encrypted secret key
* App automatically decrypts and stores it in Keychain
3. Third Layer: **Firebase Authentication**
* Every request requires a Firebase idToken
* Tokens refresh hourly
* Backend caches tokens for 45 minutes
* 15-minute window for token updates
## Request Headers
```ts api-client.ts theme={null}
// For AI endpoints (POST)
method: 'POST',
headers: {
'Content-Type': 'application/json',
Authorization: `Bearer ${idToken}`, // Firebase idToken
'x-signature': signature, // HMAC signature
'x-timestamp': timestamp, // Timestamp
'x-nonce': nonce, // Nonce
...
}
```
```ts useHmac.ts theme={null}
// For AUTH endpoint (POST)
headers: {
'Content-Type': 'application/json',
'x-signature': signature,
'x-timestamp': timestamp,
'x-nonce': nonce,
'x-app-identifier': appIdentifier,
'x-device-id': deviceId,
'x-platform': platform,
'x-user-id': userId,
},
```
## Important Notes
* Auth endpoint is used only once when the app first opens
* Rate limited to 1 auth request per 5 minutes
* HMAC secret key is stored securely in Keychain
* All requests require both HMAC signature and Firebase token
### How to start on Local?
1. You can start your backend on local with `pnpm run dev`
2. Then you can send requests to `http://localhost:3000/...`
But if you try to send requests with your local device, you can't do that.
I believe the easiest way to test your backend is using the ngrok.
You can check: [ngrok](https://ngrok.com/) but be careful. It is opening a tunnel to your local machine.
Otherwise you can find your local ip address and send requests to it.
```bash theme={null}
ngrok http 3000
```
* Then you can send requests to `https://[your-ngrok-id].ngrok.app/...`
## How to create our AI Proxy Backend?
Now you need to clone the AI Proxy Backend (NodeJS) Repository.
Make sure you are not in the `your-project-name` folder.
```bash theme={null}
git clone https://github.com/shipmobilefast/shipmobilefast-ai-backend.git [your-project-name]-backend
```
Open your terminal and run the commend above.
Then type `cd [your-project-name]-backend`.
 After cloning the project, create two environment files:
```bash theme={null}
cp .env.example .env.local
cp .env.example .env.production
```
Install the dependencies. I am using `pnpm` but you can use `npm` or `yarn`.
```bash theme={null}
pnpm install
```
Then you need to run the `generate-keys` command to create the security keys.
```bash theme={null}
pnpm generate-keys
```
After cloning the project, create two environment files:
```bash theme={null}
cp .env.example .env.local
cp .env.example .env.production
```
Install the dependencies. I am using `pnpm` but you can use `npm` or `yarn`.
```bash theme={null}
pnpm install
```
Then you need to run the `generate-keys` command to create the security keys.
```bash theme={null}
pnpm generate-keys
```
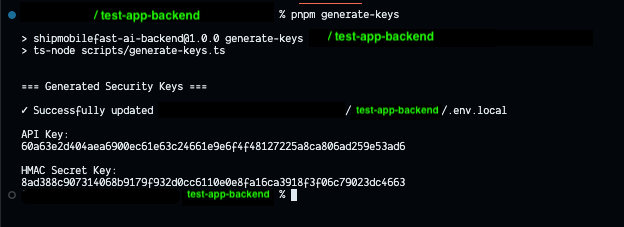 You need to add to the `.env.production` file too.
As you can see, the `API_KEY` and `HMAC_SECRET_KEY` are created.
Now type your app identifier: like: `com.shipmobilefast.app`.
And copy the `API_KEY` and paste it on the Expo project's `.env` file.
* `ALLOWED_ORIGINS` is the list of origins that are allowed to send requests to the backend.
So make it your app's identifier.
You need to add to the `.env.production` file too.
As you can see, the `API_KEY` and `HMAC_SECRET_KEY` are created.
Now type your app identifier: like: `com.shipmobilefast.app`.
And copy the `API_KEY` and paste it on the Expo project's `.env` file.
* `ALLOWED_ORIGINS` is the list of origins that are allowed to send requests to the backend.
So make it your app's identifier.
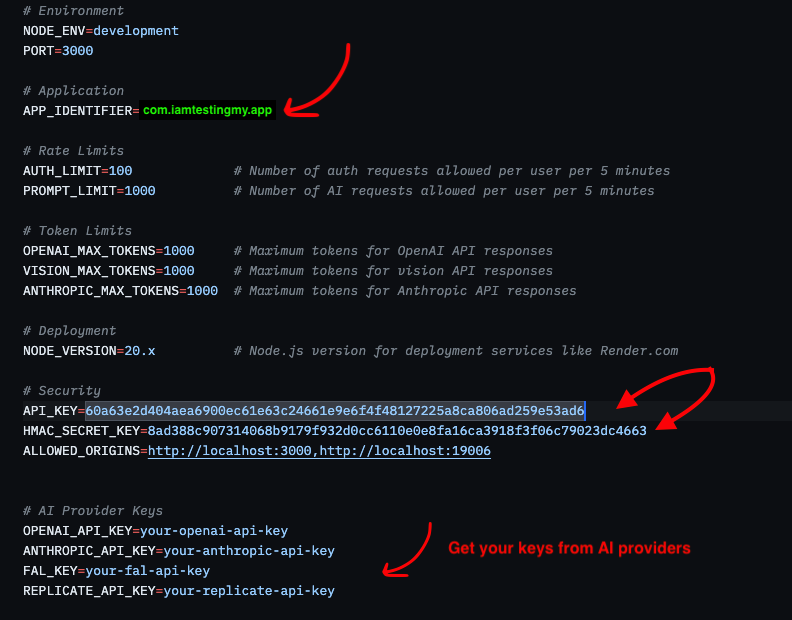 Get your AI Provider Keys.
* OpenAI: [https://platform.openai.com/api-keys](https://platform.openai.com/api-keys)
* Anthropic: [https://console.anthropic.com/settings/keys](https://console.anthropic.com/settings/keys)
* Replicate: [https://replicate.com/account/api-tokens](https://replicate.com/account/api-tokens)
* Fal AI: [https://fal.ai/dashboard/keys](https://fal.ai/dashboard/keys)
Add your AI API keys to the `.env.local` and `.env.production` files.
You don't have to use all of them in the backend. You can use only the ones you need.
Now we need to download the Firebase Service Account JSON file.
This file is very important. Do not share it with anyone.
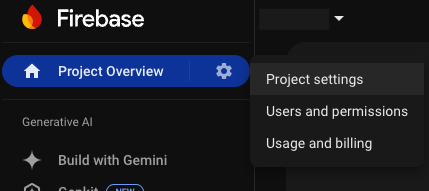
Go to the Project Settings and click on the `Service Accounts` tab.
Get your AI Provider Keys.
* OpenAI: [https://platform.openai.com/api-keys](https://platform.openai.com/api-keys)
* Anthropic: [https://console.anthropic.com/settings/keys](https://console.anthropic.com/settings/keys)
* Replicate: [https://replicate.com/account/api-tokens](https://replicate.com/account/api-tokens)
* Fal AI: [https://fal.ai/dashboard/keys](https://fal.ai/dashboard/keys)
Add your AI API keys to the `.env.local` and `.env.production` files.
You don't have to use all of them in the backend. You can use only the ones you need.
Now we need to download the Firebase Service Account JSON file.
This file is very important. Do not share it with anyone.
Go to the Project Settings and click on the `Service Accounts` tab.
 Click on the `Generate New Private Key` button.
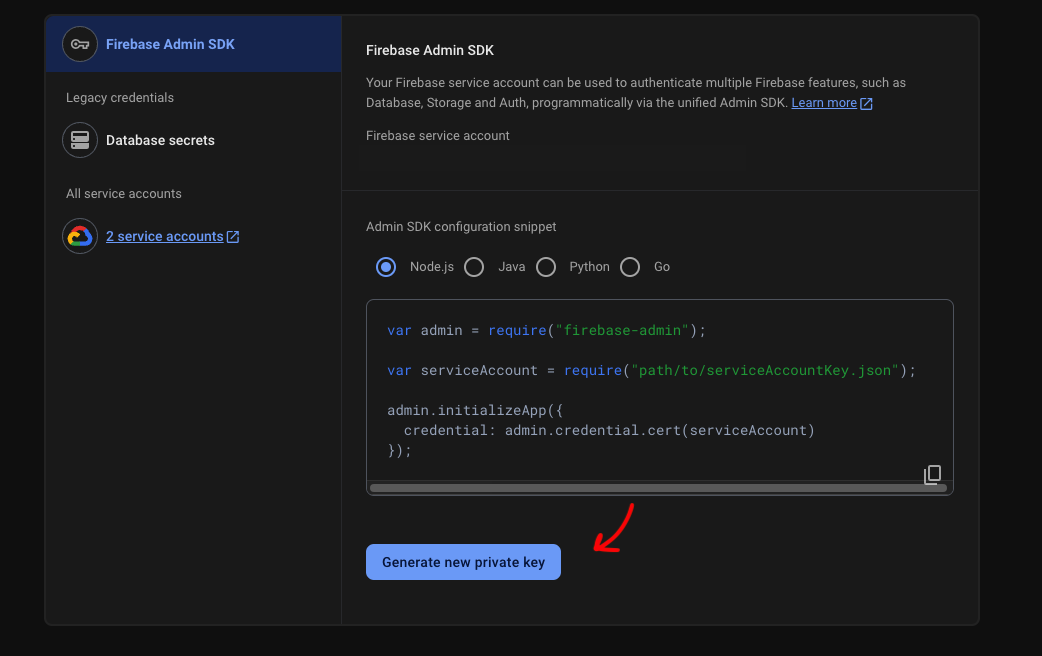 Click on the `Generate Key` button.
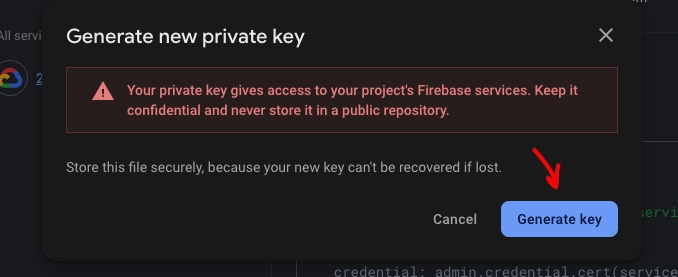 After downloading the JSON file, you need to add it to the backend and change the name as `firebase-service-account.json`.
Make sure you add the file to the `.gitignore` file and never commit it to the repository.
Never add this on Expo project.
* It should be only in the root of the backend folder.
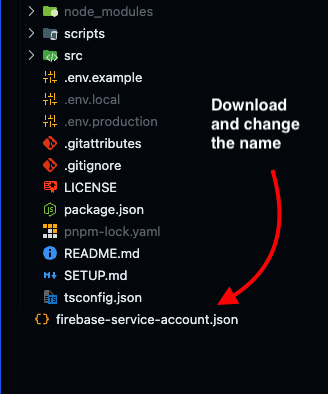
After downloading the JSON file, you need to add it to the backend and change the name as `firebase-service-account.json`.
Make sure you add the file to the `.gitignore` file and never commit it to the repository.
Never add this on Expo project.
* It should be only in the root of the backend folder.
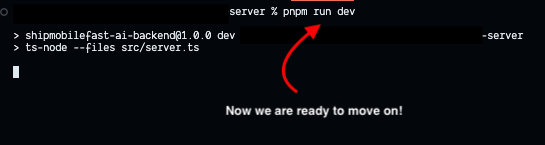
 Now you can start the backend.
```bash theme={null}
pnpm run dev
```
Now you can start the backend.
```bash theme={null}
pnpm run dev
```
 Don't forget to add API\_KEY to the Expo project's `.env` file.
### So how can I test the App? We haven't build the app yet. Let's go to the test on Simulators.
Create a development build
Don't forget to add API\_KEY to the Expo project's `.env` file.
### So how can I test the App? We haven't build the app yet. Let's go to the test on Simulators.
Create a development build